m (Separed Legendaries / minor edit.) Tag: Visual edit |
m (Added details to some UE descriptions) Tag: Visual edit |
||
| Line 25: | Line 25: | ||
|[[File:Raging Fists Icon 001.png|150x150px|link=Raging Fists]]||[[Raging Fists]]||100||550||None||+1~3 [[Ragehunter]]||{{Icon|Technique}} [[Cells#Technique|Technique Cell]]<br>{{Icon|Utility}} [[Cells#Utility|Utility Cell]]||None |
|[[File:Raging Fists Icon 001.png|150x150px|link=Raging Fists]]||[[Raging Fists]]||100||550||None||+1~3 [[Ragehunter]]||{{Icon|Technique}} [[Cells#Technique|Technique Cell]]<br>{{Icon|Utility}} [[Cells#Utility|Utility Cell]]||None |
||
|- |
|- |
||
| − | |[[File:Fists of the Shrike Icon 001.png|150x150px|link=Fists of the Shrike]]||[[Fists of the Shrike]]||100||550||None||+1~3 [[Conditioning]]||{{Icon|Technique}} [[Cells#Technique|Technique Cell]]<br>{{Icon|Mobility}} [[Cells#Mobility|Mobility Cell]]||After dodging, your next attack deals +50 |
+ | |[[File:Fists of the Shrike Icon 001.png|150x150px|link=Fists of the Shrike]]||[[Fists of the Shrike]]||100||550||None||+1~3 [[Conditioning]]||{{Icon|Technique}} [[Cells#Technique|Technique Cell]]<br>{{Icon|Mobility}} [[Cells#Mobility|Mobility Cell]]||After dodging, your next attack deals +50/75/100 (at ranks 1/6/10+) bonus damage and part damage. Stacks up to 3 times. |
|- |
|- |
||
|[[File:Quillshot's Shredders Icon 001.png|150x150px|link=Quillshot's Shredders]]||[[Quillshot's Shredders]]||100||550||None||+1~3 [[Acidic]]||{{Icon|Technique}} [[Cells#Technique|Technique Cell]]<br>{{Icon|Defence}} [[Cells#Defense|Defense Cell]]||None |
|[[File:Quillshot's Shredders Icon 001.png|150x150px|link=Quillshot's Shredders]]||[[Quillshot's Shredders]]||100||550||None||+1~3 [[Acidic]]||{{Icon|Technique}} [[Cells#Technique|Technique Cell]]<br>{{Icon|Defence}} [[Cells#Defense|Defense Cell]]||None |
||
|- |
|- |
||
| − | |[[File:Skarn's Smashers Icon 001.png|150x150px|link=Skarn's Smashers]]||[[Skarn's Smashers]]||100||550||+80 {{Element|Terra}}||+1~3 [[Knockout King]]||{{Icon|Technique}} [[Cells#Technique|Technique Cell]]<br>{{Icon|Defence}} [[Cells#Defense|Defense Cell]]||Dealing damage has a chance (based on damage dealt) to grant a stacking, refreshing 20 |
+ | |[[File:Skarn's Smashers Icon 001.png|150x150px|link=Skarn's Smashers]]||[[Skarn's Smashers]]||100||550||+80 {{Element|Terra}}||+1~3 [[Knockout King]]||{{Icon|Technique}} [[Cells#Technique|Technique Cell]]<br>{{Icon|Defence}} [[Cells#Defense|Defense Cell]]||Dealing damage has a chance (based on damage dealt) to grant a stacking, refreshing 20/30/40 (at ranks 1/6/10+) health shield that lasts for 12s. |
|- |
|- |
||
|[[File:Charred Hands Icon 001.png|150x150px|link=Charred Hands]]||[[Charred Hands]]||100||550||+80 {{Element|Blaze}}||<span style="white-space:nowrap">+1~3 [[Aetherhunter]]</span>||{{Icon|Technique}} [[Cells#Technique|Technique Cell]]<br>{{Icon|Defence}} [[Cells#Defense|Defense Cell]]||After spending 150 stamina, the next attack emits a cone of flame that deals 100/150/200 (at ranks 1/6/10+) blaze damage to each unique targets within the cone. |
|[[File:Charred Hands Icon 001.png|150x150px|link=Charred Hands]]||[[Charred Hands]]||100||550||+80 {{Element|Blaze}}||<span style="white-space:nowrap">+1~3 [[Aetherhunter]]</span>||{{Icon|Technique}} [[Cells#Technique|Technique Cell]]<br>{{Icon|Defence}} [[Cells#Defense|Defense Cell]]||After spending 150 stamina, the next attack emits a cone of flame that deals 100/150/200 (at ranks 1/6/10+) blaze damage to each unique targets within the cone. |
||
|- |
|- |
||
| − | |[[File:Winter Wolves Icon 001.png|150x150px|link=Winter Wolves]]||[[Winter Wolves]]||100||550||+80 {{Element|Frost}}||+1~3 [[Nimble]]||{{Icon|Technique}} [[Cells#Technique|Technique Cell]]<br>{{Icon|Mobility}} [[Cells#Mobility|Mobility Cell]]||After dodging, drop 3 Ice Mines on a 30 second cooldown that |
+ | |[[File:Winter Wolves Icon 001.png|150x150px|link=Winter Wolves]]||[[Winter Wolves]]||100||550||+80 {{Element|Frost}}||+1~3 [[Nimble]]||{{Icon|Technique}} [[Cells#Technique|Technique Cell]]<br>{{Icon|Mobility}} [[Cells#Mobility|Mobility Cell]]||After dodging, drop 1/2/3 ( at ranks 1/6/10+) Ice Mines around you on a 30 second cooldown that deal 300 damage. |
|- |
|- |
||
| − | |[[File:Ember Fists Icon 001.png|150x150px|link=Ember Fists]]||[[Ember Fists]]||100||550||+80 {{Element|Blaze}}||+1~3 [[Evasive Fury]]||{{Icon|Technique}} [[Cells#Technique|Technique Cell]]<br>{{Icon|Mobility}} [[Cells#Mobility|Mobility Cell]]||The fourth hit in a row deals +50 |
+ | |[[File:Ember Fists Icon 001.png|150x150px|link=Ember Fists]]||[[Ember Fists]]||100||550||+80 {{Element|Blaze}}||+1~3 [[Evasive Fury]]||{{Icon|Technique}} [[Cells#Technique|Technique Cell]]<br>{{Icon|Mobility}} [[Cells#Mobility|Mobility Cell]]||The fourth hit in a row deals +50%/100%/150% stagger damage (at ranks 1/6/10+). |
|- |
|- |
||
| − | |[[File:Thundering Bolts Icon 001.png|150x150px|link=Thundering Bolts]]||[[Thundering Bolts]]||100||550||+80 {{Element|Shock}}||<span style="white-space:nowrap">+1~3 [[Aetheric Attunement]]</span>||{{Icon|Technique}} [[Cells#Technique|Technique Cell]]<br>{{Icon|Power}} [[Cells#Power|Power Cell]]||+20 |
+ | |[[File:Thundering Bolts Icon 001.png|150x150px|link=Thundering Bolts]]||[[Thundering Bolts]]||100||550||+80 {{Element|Shock}}||<span style="white-space:nowrap">+1~3 [[Aetheric Attunement]]</span>||{{Icon|Technique}} [[Cells#Technique|Technique Cell]]<br>{{Icon|Power}} [[Cells#Power|Power Cell]]||+20%/25%/30% (at ranks 1/6/10+) damage vs Behemoth Heads. |
|- |
|- |
||
| − | |[[File:Nayzaga's Shockers Icon 001.png|150x150px|link=Nayzaga's Shockers]]||[[Nayzaga's Shockers]]||100||550||+80 {{Element|Shock}}||+1~3 [[Savagery]]||{{Icon|Technique}} [[Cells#Technique|Technique Cell]]<br>{{Icon|Utility}} [[Cells#Utility|Utility Cell]]||After a Behemoth is staggered, heal for 100 |
+ | |[[File:Nayzaga's Shockers Icon 001.png|150x150px|link=Nayzaga's Shockers]]||[[Nayzaga's Shockers]]||100||550||+80 {{Element|Shock}}||+1~3 [[Savagery]]||{{Icon|Technique}} [[Cells#Technique|Technique Cell]]<br>{{Icon|Utility}} [[Cells#Utility|Utility Cell]]||After a Behemoth is staggered, heal for 100/200/300 (at ranks 1/6/10+). |
|- |
|- |
||
|[[File:Pangar's Punishers Icon 001.png|150x150px|link=Pangar's Punishers]]||[[Pangar's Punishers]]||100||550||+80 {{Element|Frost}}||+1~3 [[Knockout King]]||{{Icon|Technique}} [[Cells#Technique|Technique Cell]]<br>{{Icon|Defence}} [[Cells#Defense|Defense Cell]]||None. |
|[[File:Pangar's Punishers Icon 001.png|150x150px|link=Pangar's Punishers]]||[[Pangar's Punishers]]||100||550||+80 {{Element|Frost}}||+1~3 [[Knockout King]]||{{Icon|Technique}} [[Cells#Technique|Technique Cell]]<br>{{Icon|Defence}} [[Cells#Defense|Defense Cell]]||None. |
||
|- |
|- |
||
| − | |[[File:Inferno's Flames Icon 001.png|150x150px|link=Inferno's Flames]]||[[Inferno's Flames]]||100||550||+80 {{Element|Blaze}}||+1~3 [[Overpower]]||{{Icon|Power}} [[Cells#Power|Power Cell]] <br>{{Icon|Power}} [[Cells#Power|Power Cell]]||The eighth hit in a row deals 75/150/225 (at ranks 1/6/10+) damage and major blaze damage. |
+ | |[[File:Inferno's Flames Icon 001.png|150x150px|link=Inferno's Flames]]||[[Inferno's Flames]]||100||550||+80 {{Element|Blaze}}||+1~3 [[Overpower]]||{{Icon|Power}} [[Cells#Power|Power Cell]] <br>{{Icon|Power}} [[Cells#Power|Power Cell]]||The eighth hit in a row deals +75/150/225 (at ranks 1/6/10+) damage and major blaze damage. |
|- |
|- |
||
| − | |[[File:Storm Breakers Icon 001.png|150x150px|link=Storm Breakers]]||[[Storm Breakers]]||100||550||+80 {{Element|Shock}}||+1~3 [[Aetheric Attunement]]||{{Icon|Technique}} [[Cells#Technique|Technique Cell]]<br>{{Icon|Mobility}} [[Cells#Mobility|Mobility Cell]]||After dodging through an attack, extend Mantra timeout by 1 |
+ | |[[File:Storm Breakers Icon 001.png|150x150px|link=Storm Breakers]]||[[Storm Breakers]]||100||550||+80 {{Element|Shock}}||+1~3 [[Aetheric Attunement]]||{{Icon|Technique}} [[Cells#Technique|Technique Cell]]<br>{{Icon|Mobility}} [[Cells#Mobility|Mobility Cell]]||After dodging through an attack, extend Mantra timeout by 1/2/3 seconds (at ranks 1/6/10+). |
|- |
|- |
||
|[[File:Kharabak's Pincers Icon 001.png|150x150px|link=Kharabak's Pincers]]||[[Kharabak's Pincers]]||100||550||+80 {{Element|Terra}}||+1~3 [[Bladestorm]]||{{Icon|Technique}} [[Cells#Technique|Technique Cell]]<br>{{Icon|Mobility}} [[Cells#Mobility|Mobility Cell]]||None. |
|[[File:Kharabak's Pincers Icon 001.png|150x150px|link=Kharabak's Pincers]]||[[Kharabak's Pincers]]||100||550||+80 {{Element|Terra}}||+1~3 [[Bladestorm]]||{{Icon|Technique}} [[Cells#Technique|Technique Cell]]<br>{{Icon|Mobility}} [[Cells#Mobility|Mobility Cell]]||None. |
||
| Line 53: | Line 53: | ||
|[[File:Hands of Night Icon 001.png|150x150px|link=Hands of Night]]||[[Hands of Night]]||100||550||+80 {{Element|Umbral}}||+1~3 [[Cunning]]||{{Icon|Technique}} [[Cells#Technique|Technique Cell]]<br>{{Icon|Utility}} [[Cells#Utility|Utility Cell]]||When under 20% health, deal +50% damage. |
|[[File:Hands of Night Icon 001.png|150x150px|link=Hands of Night]]||[[Hands of Night]]||100||550||+80 {{Element|Umbral}}||+1~3 [[Cunning]]||{{Icon|Technique}} [[Cells#Technique|Technique Cell]]<br>{{Icon|Utility}} [[Cells#Utility|Utility Cell]]||When under 20% health, deal +50% damage. |
||
|- |
|- |
||
| − | |[[File:Sovereign's Sceptres Icon 001.png|150x150px|link=Sovereign's Sceptres]]||[[Sovereign's Sceptres]]||100||550||+80 {{Element|Terra}}||+1~3 [[Sharpened]]||{{Icon|Power}} [[Cells#Power|Power Cell]]<br>{{Icon|Utility}} [[Cells#Utility|Utility Cell]]||After not dealing damage for 4 seconds, |
+ | |[[File:Sovereign's Sceptres Icon 001.png|150x150px|link=Sovereign's Sceptres]]||[[Sovereign's Sceptres]]||100||550||+80 {{Element|Terra}}||+1~3 [[Sharpened]]||{{Icon|Power}} [[Cells#Power|Power Cell]]<br>{{Icon|Utility}} [[Cells#Utility|Utility Cell]]||After not dealing damage for 4 seconds, the next 3/4/5 attacks (at ranks 1/6/10+) deal 50% increased damage. |
|- |
|- |
||
|[[File:Stalker's Scorn Icon 001.png|150x150px|link=Stalker's Scorn]]||[[Stalker's Scorn]]||100||550||+80 {{Element|Umbral}}||+1~3 [[Wild Frenzy]]||<span style="white-space:nowrap">{{Icon|Technique}} [[Cells#Technique|Technique]]</span> <span style="white-space:nowrap">[[Cells#Technique|Cell]]</span><br>{{Icon|Utility}} [[Cells#Utility|Utility Cell]] |
|[[File:Stalker's Scorn Icon 001.png|150x150px|link=Stalker's Scorn]]||[[Stalker's Scorn]]||100||550||+80 {{Element|Umbral}}||+1~3 [[Wild Frenzy]]||<span style="white-space:nowrap">{{Icon|Technique}} [[Cells#Technique|Technique]]</span> <span style="white-space:nowrap">[[Cells#Technique|Cell]]</span><br>{{Icon|Utility}} [[Cells#Utility|Utility Cell]] |
||
| − | | |
+ | |On chance after dealing damage, generate Shadow Orbs that grant +1.5%/2%/2.25% (at ranks 1/6/10+) damage for 5 seconds. At 5+ Orbs, the bonus doubles. |
|- |
|- |
||
| − | |[[File:Valomyr's Visions Icon 001.png|150x150px|link=Valomyr's Visions]]||[[Valomyr's Visions]]||100||550||<span style="white-space:nowrap">+80 {{Element|Radiant}}</span>||+1~3 [[Aetherhunter]]||{{Icon|Power}} [[Cells#Power|Power Cell]]<br>{{Icon|Utility}} [[Cells#Utility|Utility Cell]]||Once charged, your next attack will deal 300 |
+ | |[[File:Valomyr's Visions Icon 001.png|150x150px|link=Valomyr's Visions]]||[[Valomyr's Visions]]||100||550||<span style="white-space:nowrap">+80 {{Element|Radiant}}</span>||+1~3 [[Aetherhunter]]||{{Icon|Power}} [[Cells#Power|Power Cell]]<br>{{Icon|Utility}} [[Cells#Utility|Utility Cell]]||Once charged, your next attack will deal +300/+425/+550 (at ranks 1/6/10+) bonus radiant damage. Charge rate increases with higher current health. |
|- |
|- |
||
|[[File:Brawlers of Boreus Icon 001.png|150x150px|link=Brawlers of Boreus]]||[[Brawlers of Boreus]]||100||550||<span style="white-space:nowrap">+80 {{Element|Frost}}</span>||<span style="white-space:nowrap">+1~3 [[Conditioning]]</span>||<span style="white-space:nowrap">{{Icon|Power}} [[Cells#Power|Power Cell]]<br>{{Icon|Defence}} [[Cells#Defence|Defence Cell]]</span>||After Surging, generate 2 Frost Sprites that grant your next attack 30/45/60 (at ranks 1/6/10+) damage and minor frost damage (Max 4 Sprites) |
|[[File:Brawlers of Boreus Icon 001.png|150x150px|link=Brawlers of Boreus]]||[[Brawlers of Boreus]]||100||550||<span style="white-space:nowrap">+80 {{Element|Frost}}</span>||<span style="white-space:nowrap">+1~3 [[Conditioning]]</span>||<span style="white-space:nowrap">{{Icon|Power}} [[Cells#Power|Power Cell]]<br>{{Icon|Defence}} [[Cells#Defence|Defence Cell]]</span>||After Surging, generate 2 Frost Sprites that grant your next attack 30/45/60 (at ranks 1/6/10+) damage and minor frost damage (Max 4 Sprites) |
||
Revision as of 17:03, 2 May 2020

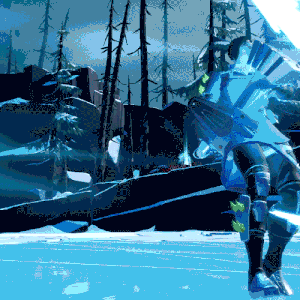
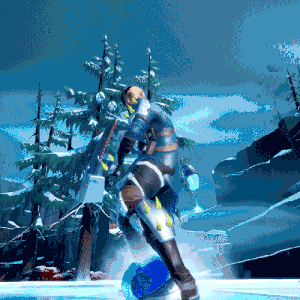
The Aether Strikers are a blunt weapon type in Dauntless.
Summary
Slayers will get access to the aether strikers fairly early in progression – right around the same time you get your first pair of repeaters. Once you’ve grabbed the Scarred Master’s quest, you’ll be able to talk to her for all of your striker crafting needs. And there will be quite a few! Just like with the sword and war pike, you’ll be able to craft a unique set of strikers for each Behemoth you slay.
Lore
Aether Strikers was a weapon originally only used by the Adamant Fists, which was a group that lived in the Adamant Temple. The weapons were originally not used to kill behemoths but to defeat human foes that wanted to do harm to the Adamant Temple. It was not until Kat returned from the Temple to Ramsgate that she gave the Aethersmith the Gauntlets she was allowed to take with her, that the Aether Strikers became a weapon to hunt Behemoths.[1]
Instead of acting as an extension of self, the strikers function as a catalyst, transforming the very Slayer who wields them into a weapon of flesh and deadly focus. But the aether strikers can only enhance what is already there. If you truly want to master the Way of the Fist – and prove your worth to the Scarred Master – you’ll need to do more than throw a quick punch. Combos. Chains. Mantras. Techniques. Each aspect of the aether strikers must be understood, practiced, and honed to perfection.
The strikers are pugilist’s weapons, but they also have a spiritual component. To truly master them, you’ll need to learn to charge up special energies called Mantras, and understand when to unleash their powers.[2]
Weapons
| Name | Power | Elemental Power | Perks | Cell Slots | Unique Effects | ||
|---|---|---|---|---|---|---|---|
| Recruit's Strikers | 80 | 80 | None | None | None | None | |
| Raging Fists | 100 | 550 | None | +1~3 Ragehunter | Technique Cell Utility Cell |
None | |
| Fists of the Shrike | 100 | 550 | None | +1~3 Conditioning | Technique Cell Mobility Cell |
After dodging, your next attack deals +50/75/100 (at ranks 1/6/10+) bonus damage and part damage. Stacks up to 3 times. | |
| Quillshot's Shredders | 100 | 550 | None | +1~3 Acidic | Technique Cell Defense Cell |
None | |
| Skarn's Smashers | 100 | 550 | +80 |
+1~3 Knockout King | Technique Cell Defense Cell |
Dealing damage has a chance (based on damage dealt) to grant a stacking, refreshing 20/30/40 (at ranks 1/6/10+) health shield that lasts for 12s. | |
| Charred Hands | 100 | 550 | +80 |
+1~3 Aetherhunter | Technique Cell Defense Cell |
After spending 150 stamina, the next attack emits a cone of flame that deals 100/150/200 (at ranks 1/6/10+) blaze damage to each unique targets within the cone. | |
| Winter Wolves | 100 | 550 | +80 |
+1~3 Nimble | Technique Cell Mobility Cell |
After dodging, drop 1/2/3 ( at ranks 1/6/10+) Ice Mines around you on a 30 second cooldown that deal 300 damage. | |
| Ember Fists | 100 | 550 | +80 |
+1~3 Evasive Fury | Technique Cell Mobility Cell |
The fourth hit in a row deals +50%/100%/150% stagger damage (at ranks 1/6/10+). | |
| Thundering Bolts | 100 | 550 | +80 |
+1~3 Aetheric Attunement | Technique Cell Power Cell |
+20%/25%/30% (at ranks 1/6/10+) damage vs Behemoth Heads. | |
| Nayzaga's Shockers | 100 | 550 | +80 |
+1~3 Savagery | Technique Cell Utility Cell |
After a Behemoth is staggered, heal for 100/200/300 (at ranks 1/6/10+). | |
| Pangar's Punishers | 100 | 550 | +80 |
+1~3 Knockout King | Technique Cell Defense Cell |
None. | |
| Inferno's Flames | 100 | 550 | +80 |
+1~3 Overpower | Power Cell Power Cell |
The eighth hit in a row deals +75/150/225 (at ranks 1/6/10+) damage and major blaze damage. | |
| Storm Breakers | 100 | 550 | +80 |
+1~3 Aetheric Attunement | Technique Cell Mobility Cell |
After dodging through an attack, extend Mantra timeout by 1/2/3 seconds (at ranks 1/6/10+). | |
| Kharabak's Pincers | 100 | 550 | +80 |
+1~3 Bladestorm | Technique Cell Mobility Cell |
None. | |
| Hands of Dawn | 100 | 550 | +80 |
+1~3 Cunning | Technique Cell Power Cell |
10% chance for attacks to hit twice | |
| Hands of Night | 100 | 550 | +80 |
+1~3 Cunning | Technique Cell Utility Cell |
When under 20% health, deal +50% damage. | |
| Sovereign's Sceptres | 100 | 550 | +80 |
+1~3 Sharpened | Power Cell Utility Cell |
After not dealing damage for 4 seconds, the next 3/4/5 attacks (at ranks 1/6/10+) deal 50% increased damage. | |
| Stalker's Scorn | 100 | 550 | +80 |
+1~3 Wild Frenzy | Technique Cell Utility Cell |
On chance after dealing damage, generate Shadow Orbs that grant +1.5%/2%/2.25% (at ranks 1/6/10+) damage for 5 seconds. At 5+ Orbs, the bonus doubles. | |
| Valomyr's Visions | 100 | 550 | +80 |
+1~3 Aetherhunter | Power Cell Utility Cell |
Once charged, your next attack will deal +300/+425/+550 (at ranks 1/6/10+) bonus radiant damage. Charge rate increases with higher current health. | |
| Brawlers of Boreus | 100 | 550 | +80 |
+1~3 Conditioning | Power Cell Defence Cell |
After Surging, generate 2 Frost Sprites that grant your next attack 30/45/60 (at ranks 1/6/10+) damage and minor frost damage (Max 4 Sprites) | |
Legendaries
Facing a the final Boss in Escalation will unlock blueprints for all of its legendary weapons. These high-powered weapons aren't easy to craft, but the perks are worth the extra effort.
| Name | Power | Elemental Power | Perks | Cell Slots | Unique Effects | ||
|---|---|---|---|---|---|---|---|
| Mistral Currents | 500 | 550 | +80 |
Bond | Legendary Ability: [G] to teleport to a Behemoth, dealing | ||
| Tectonic Faults | 500 | 550 | +80 |
Bond | Legendary Ability: [G] to enter a rage, gaining new attacks for 15 seconds. Deals +25% damage when the target is below 50% health. Usable once, but resets on Behemoth kill. | ||
Aether Strikers Specials
| Adamant Bolt | Unleash energy in a focused blast, dealing 900 damage to the first enemy hit. Deals up to +100% damage when Tempest Form and Karma Breaker's effects are active. | Available from the quest Meet the Master (Quest). | |
| Titan's Crash | Unleash energy forward in a pressure wave, dealing 500 damage to the closest target and 166 damage to nearby target. Deals up to +100% damage when Tempest Form and Karma Breaker's effects are active. | Strikers Mastery level 8 |
Aether Strikers Mods
| Cyclonic Strikeplate | Tempest Form duration increased by 10 seconds. When Tempest Form has less than 10 seconds remaining, deal +15% damage. | Strikers Mastery level 6 | |
| Echo Bracedriver | Critical strikes increase the damage dealt by Karma Breaker's damage over time by 5% until the debuff ends or is refreshed. | Strikers Mastery level 10 | |
| Inertial Fistguard | Surge deals +25% damage. After surging, gain +5% movespeed for 8 seconds. Stacks up to 3 times. | Strikers Mastery level 16 |
Techniques
Perhaps the most important component of the Aether strikers system are techniques.
These are special moves that vary depending on how many Mantras you have charged up.
Tempest Form
The Tempest Form is the simplest technique, requiring only one Mantra to use.
Activate it to focus your energy and increase your attack speed. This is a relatively long boost.

Karma Breaker
The Karma Breaker requires two Mantras and unleashes a forward strike.
This strike damages the first target it hits and deals damage over time for an extended period.
Adamant Bolt
The Adamant Bolt releases a focused, cannon-like blast of energy, dealing damage to the first enemy it hits.
It also deals bonus damage if either Tempest Form or Karma Breaker is active, and even more damage if they’re both active.
You’ll need to light up all three Mantras in order to use this one.
Adamant Bolt can be swapped for Titan’s Crash, a devastating close-range Attack that does more damage when both Tempest Form and Karma Breaker are active.
Mantra
Once you’ve charged up a Mantra, you’ll see a timer and two special skills light up on your UI.

The first one is Surge: a skill you can use after gaining any Mantra or using any technique. Tap your special button to execute a dash attack that punches through enemies and – this part is important – refreshes your timer.
Timing is Everything
Before we go further into techniques and combo chains, let’s explain the Mantra timer. This glowing meter lets you see how much time you have left before your current Mantra(s) expire. You can refresh it by either (a) activating Surge or (b) landing another successful combo before it times out. If it expires, you’ll lose all of your current Mantra charges and have to start over with another combo.
Controls
Moves
Rapid Strikes
![]()
Heavy Strikes
![]()
Surge
![]() (Usable after gaining any Mantra or using any Technique)
(Usable after gaining any Mantra or using any Technique)
Techniques
![]() (HOLD) (Requires at least one Mantra active - Mantra times out after a short time)
(HOLD) (Requires at least one Mantra active - Mantra times out after a short time)
- Tempest Form
 (HOLD) (Requires 1 Mantra)
 - Karma Breaker
(HOLD) (Requires 2 Mantras) - Adamant Bolt/Titan's Crash
(HOLD) (Requires 3 Mantras)
Combos
Focused Assault
Three quick hits. Generate Focus Mantra
![]() >
> ![]() >
> ![]()
Spirit Barrage
A flurry of hits. Generates the Spirit Mantra
![]() >
> ![]() >
> ![]()
Mighty Squall
Three powerfull strikes. Generates the Might Mantra.
Moves
Rapid Strikes
![]()
Heavy Strikes
![]()
Surge
![]() (Usable after gaining any Mantra or using any Technique)
(Usable after gaining any Mantra or using any Technique)
Techniques
![]() (HOLD) (Requires at least one Mantra active - Mantra times out after a short time)
(HOLD) (Requires at least one Mantra active - Mantra times out after a short time)
- Tempest Form
(HOLD) (Requires 1 Mantra) - Karma Breaker
(HOLD) (Requires 2 Mantras) - Adamant Bolt/Titan's Crash
(HOLD) (Requires 3 Mantras)
Combos
Focused Assault
Three quick hits. Generate Focus Mantra
![]()
![]()
![]()
Spirit Barrage
A flurry of hits. Generates the Spirit Mantra
![]()
![]()
![]() (Consumes stamina)
(Consumes stamina)
Mighty Squall
Three powerfull strikes. Generates the Might Mantra.
Moves
Rapid Strikes
![]()
Heavy Strikes
![]()
Surge
![]() (Usable after gaining any Mantra or using any Technique)
(Usable after gaining any Mantra or using any Technique)
Techniques
![]() (HOLD) (Requires at least one Mantra active - Mantra times out after a short time)
(HOLD) (Requires at least one Mantra active - Mantra times out after a short time)
- Tempest Form
(HOLD) (Requires 1 Mantra) - Karma Breaker
(HOLD) (Requires 2 Mantras) - Adamant Bolt/Titan's Crash
(HOLD) (Requires 3 Mantras)
Combos
Focused Assault
Three quick hits. Generate Focus Mantra
![]()
![]()
![]()
Spirit Barrage
A flurry of hits. Generates the Spirit Mantra
![]()
![]()
![]()
Mighty Squall
Three powerfull strikes. Generates the Might Mantra.
Trivia
- The Aether Strikers first revealed on Nintendo Direct September 4. 2019. [3].
Guide
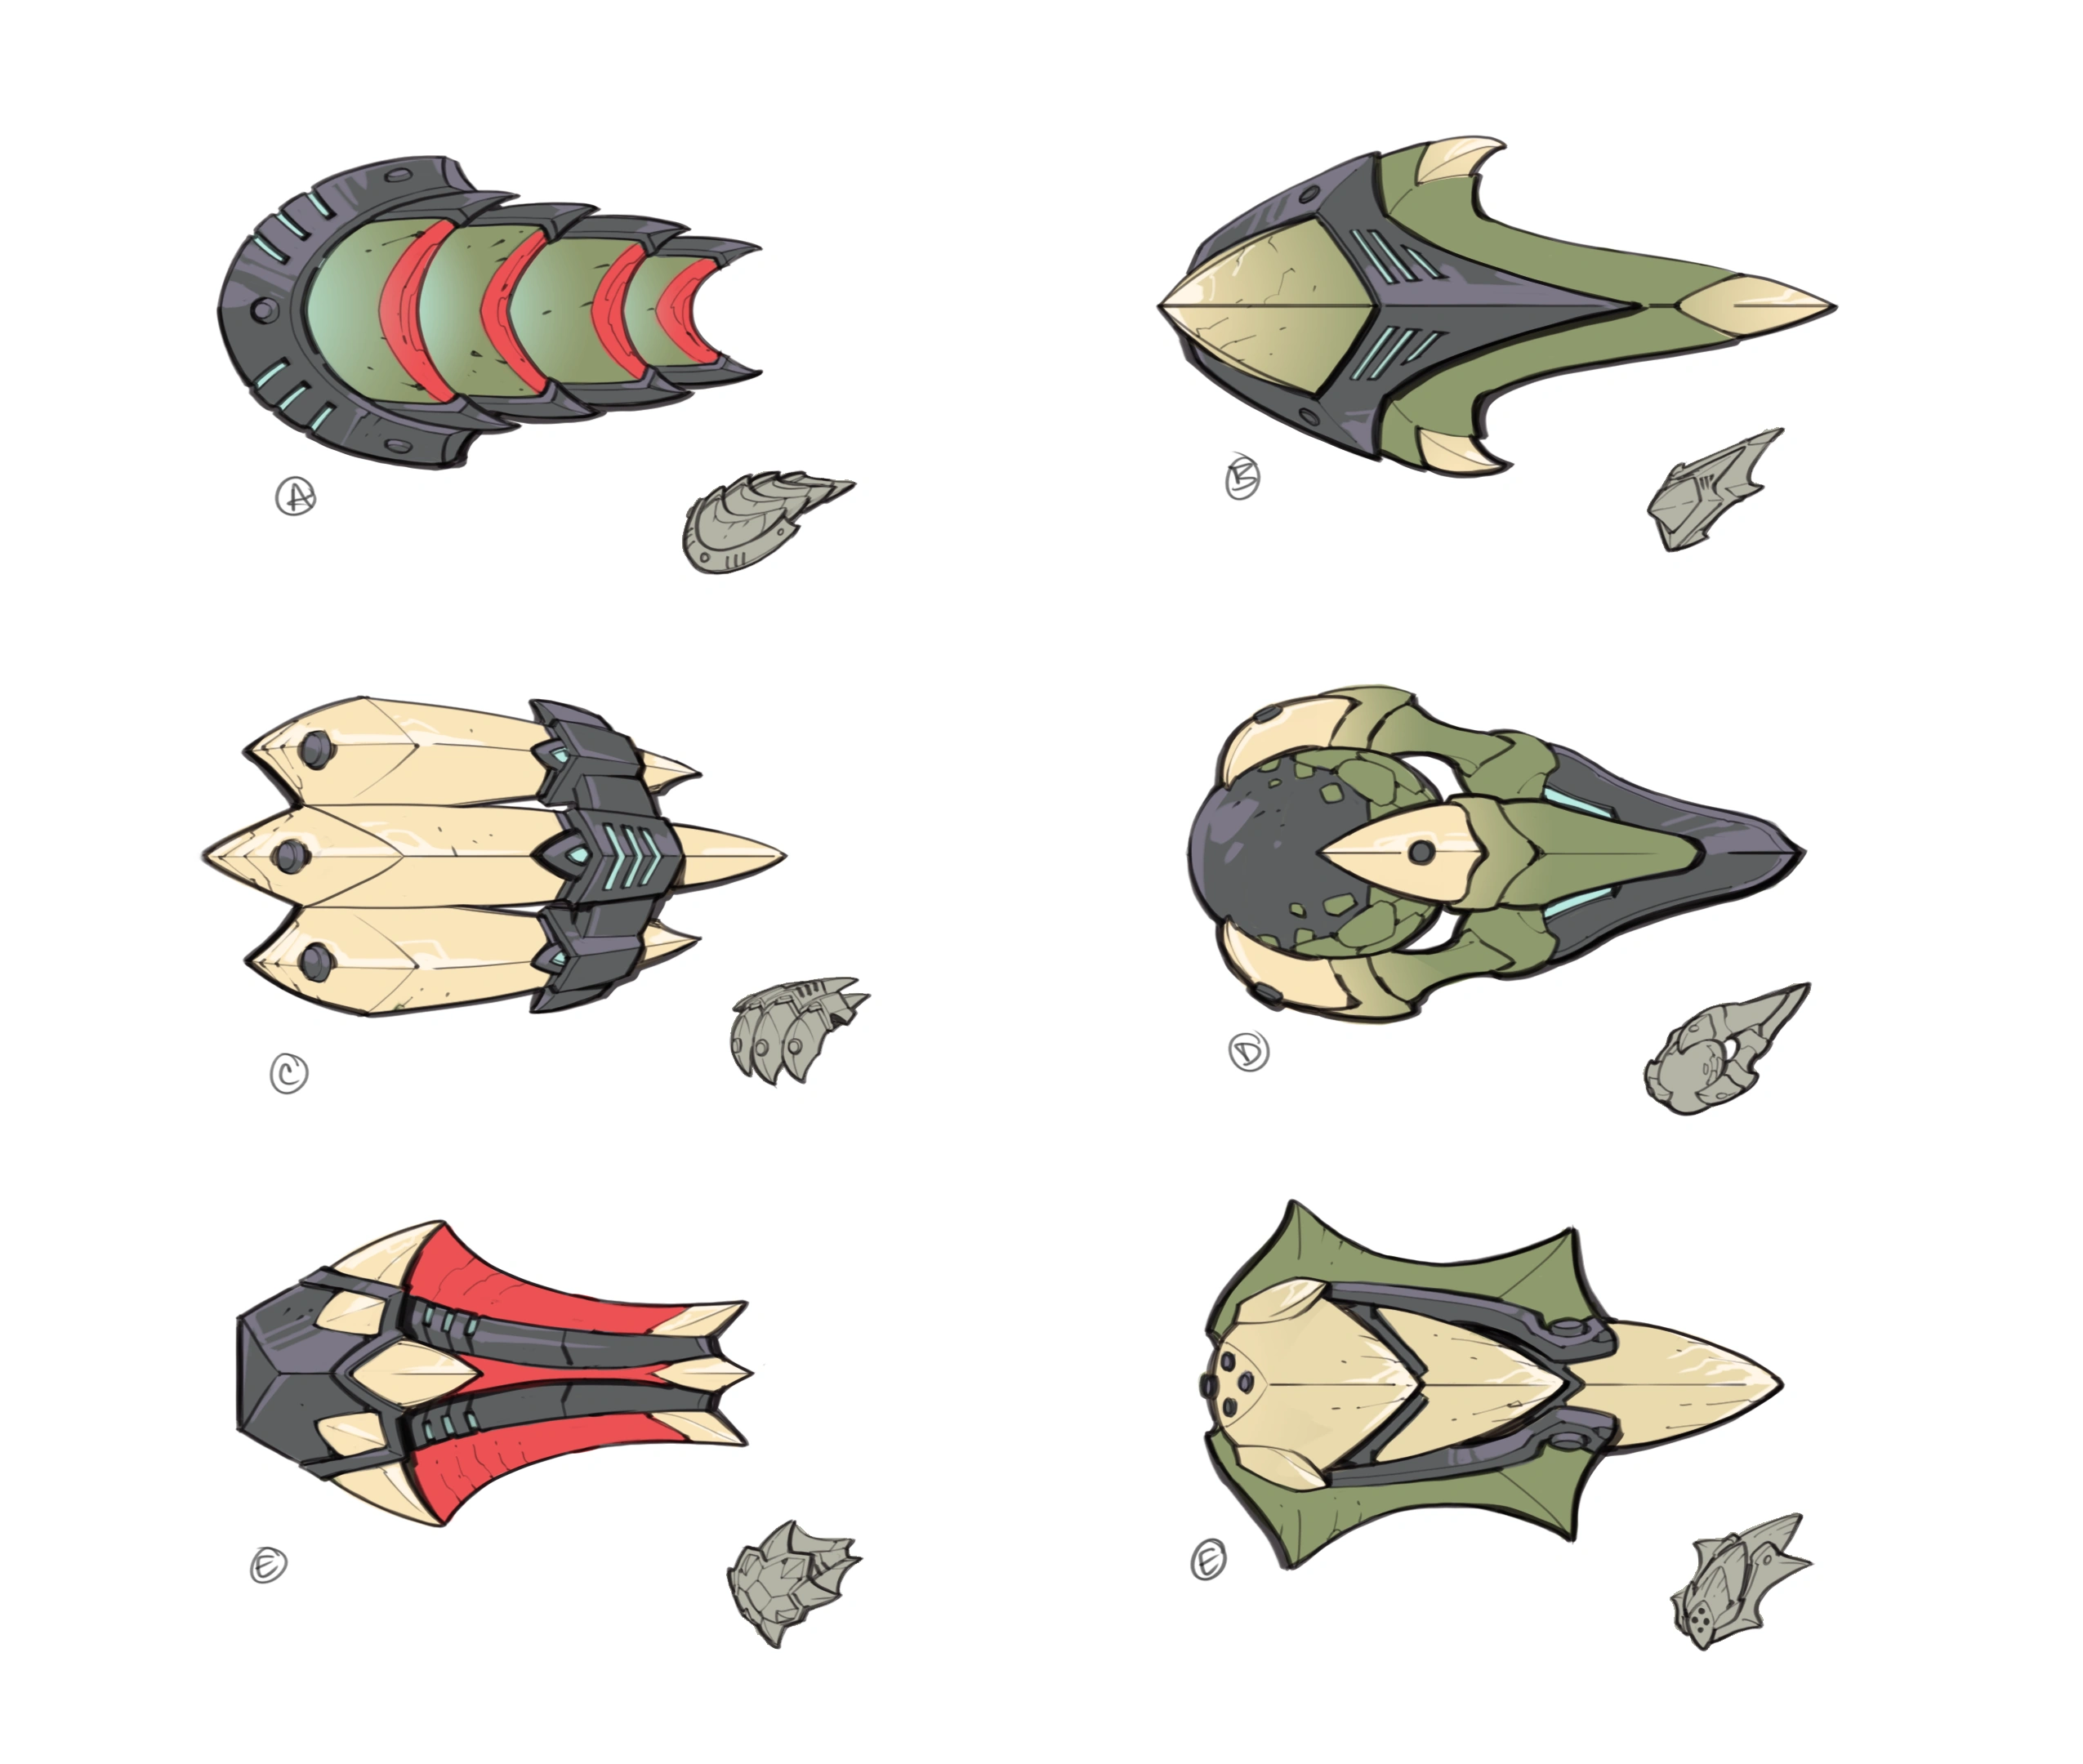
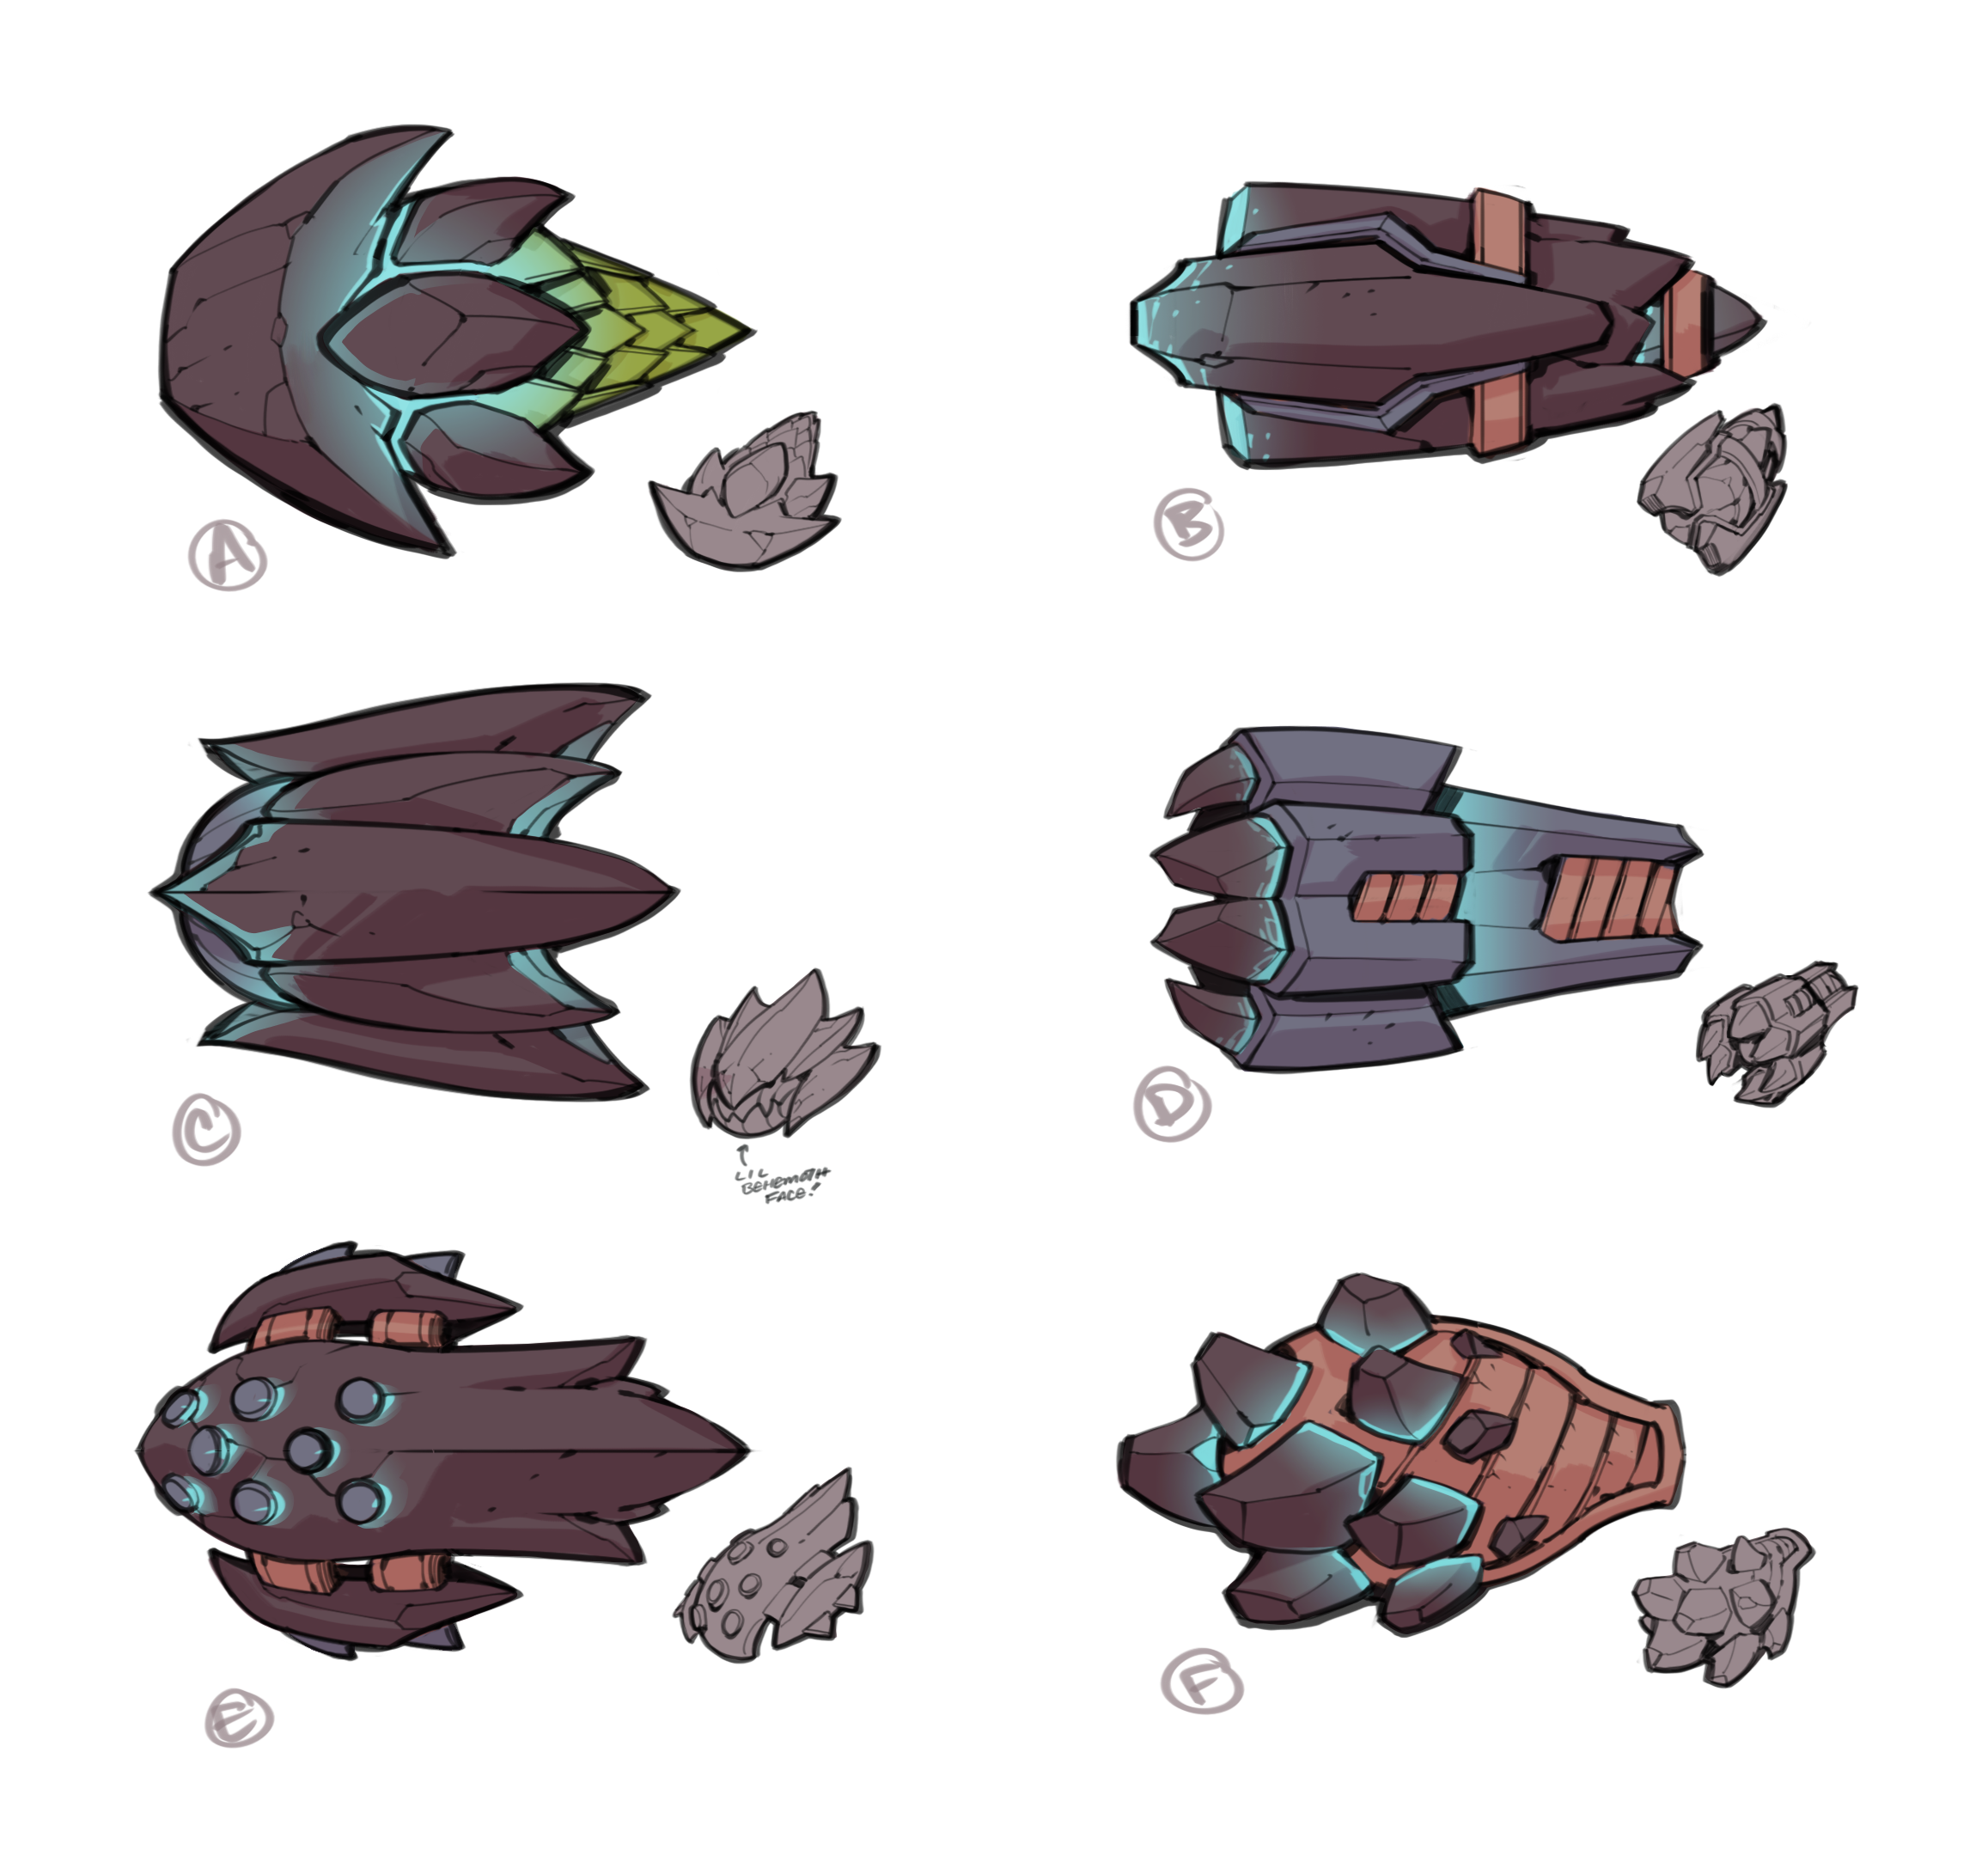
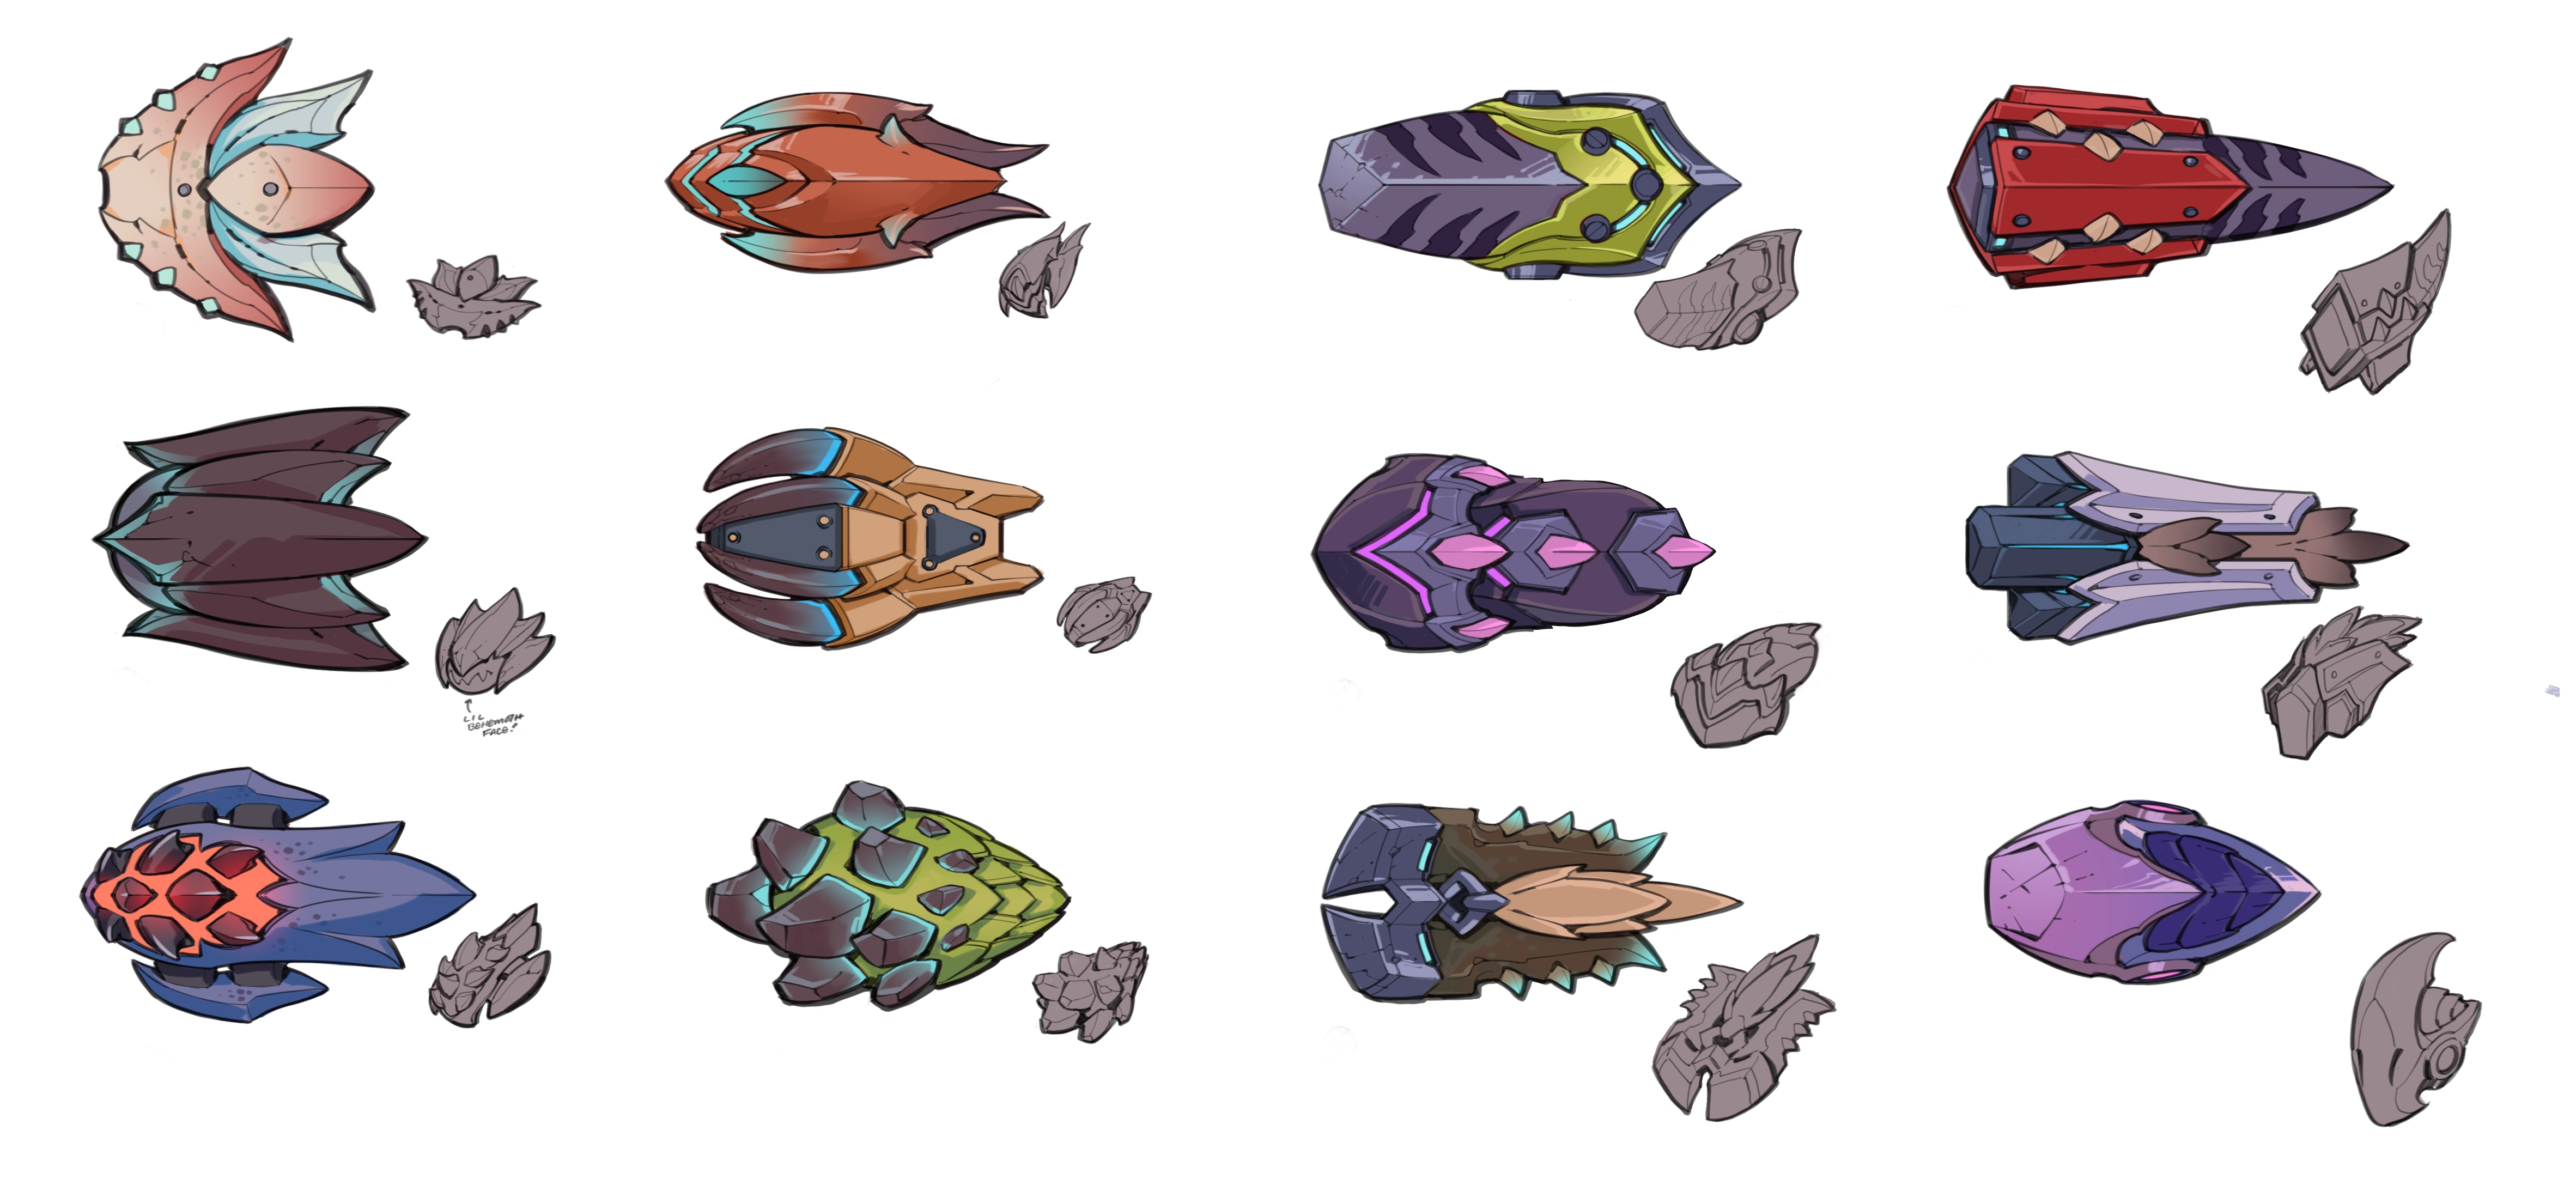
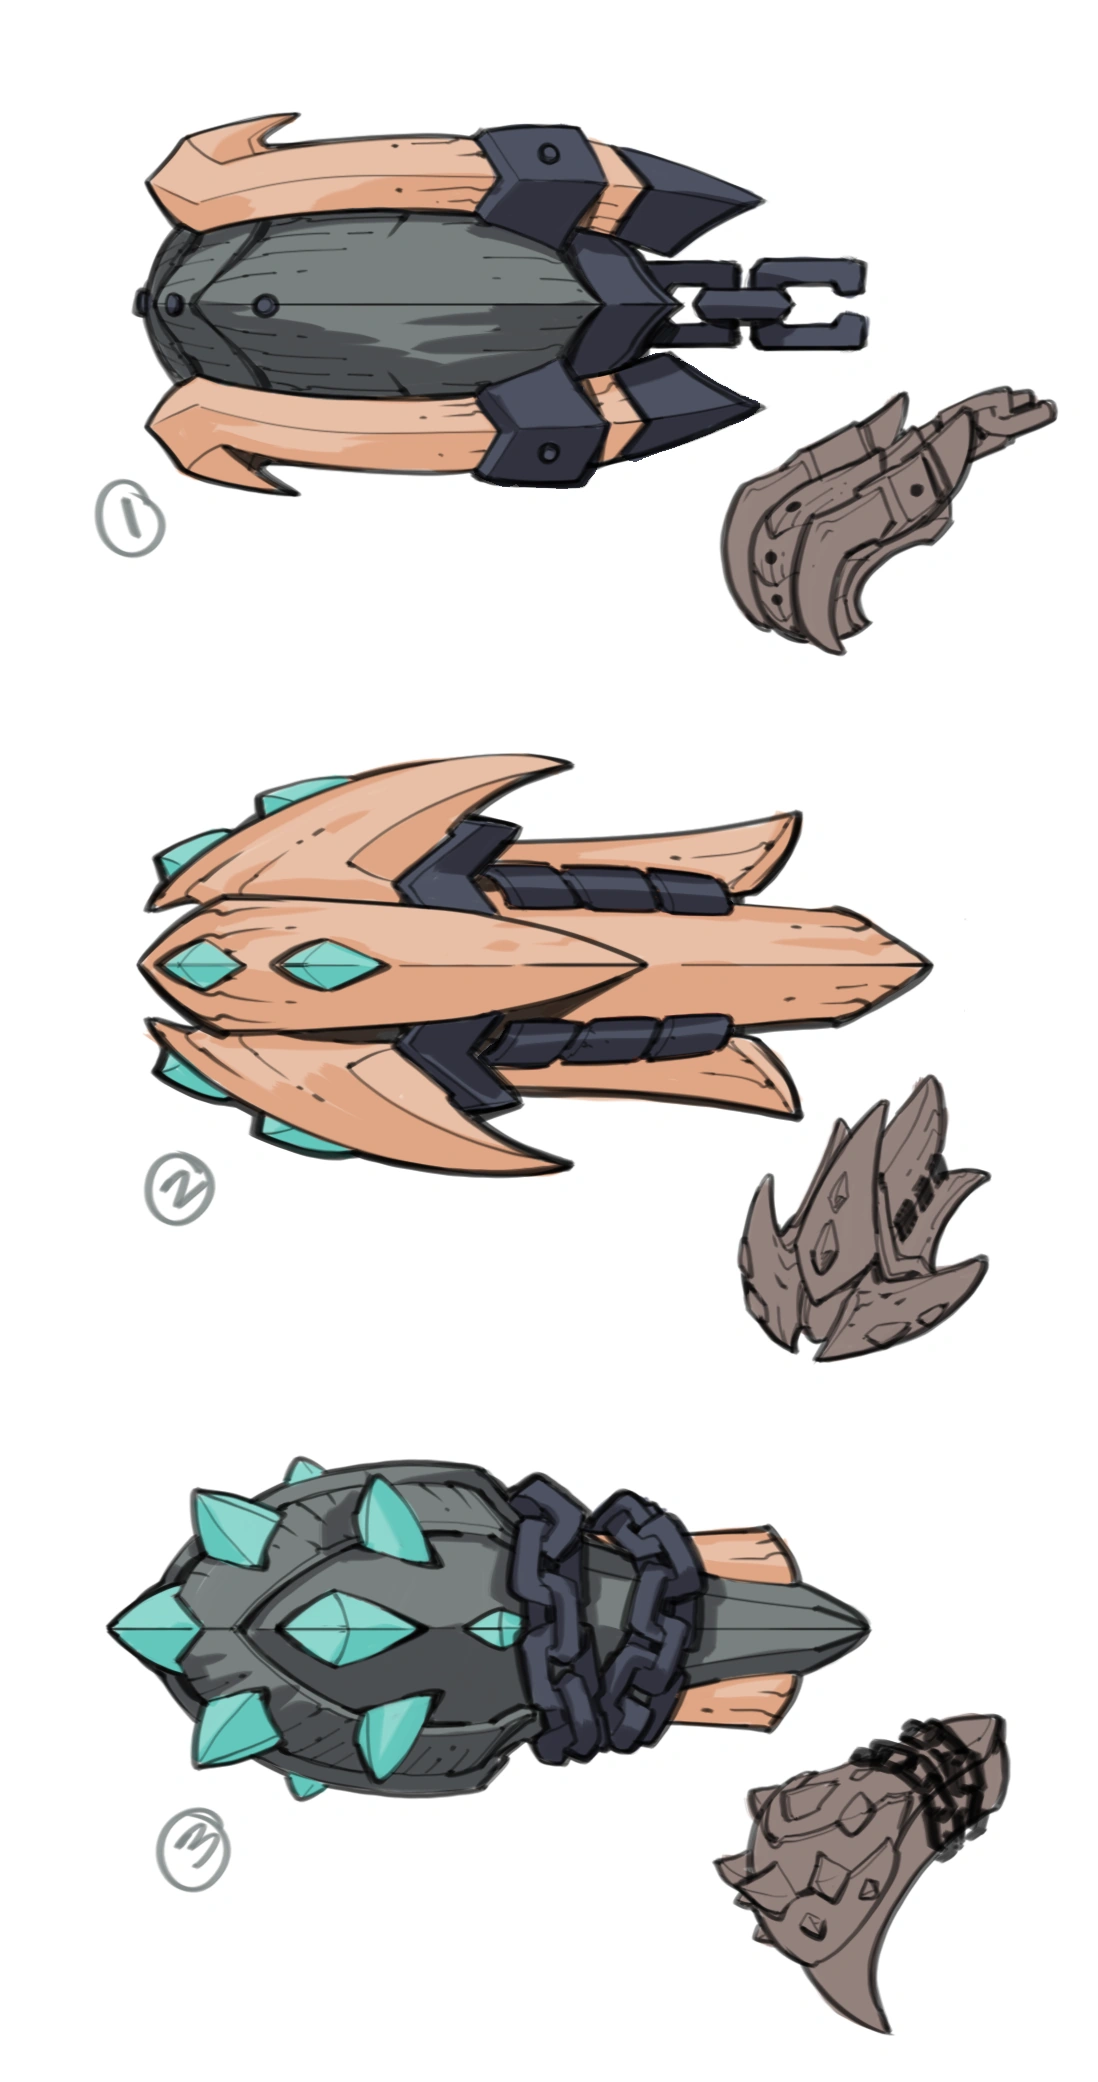
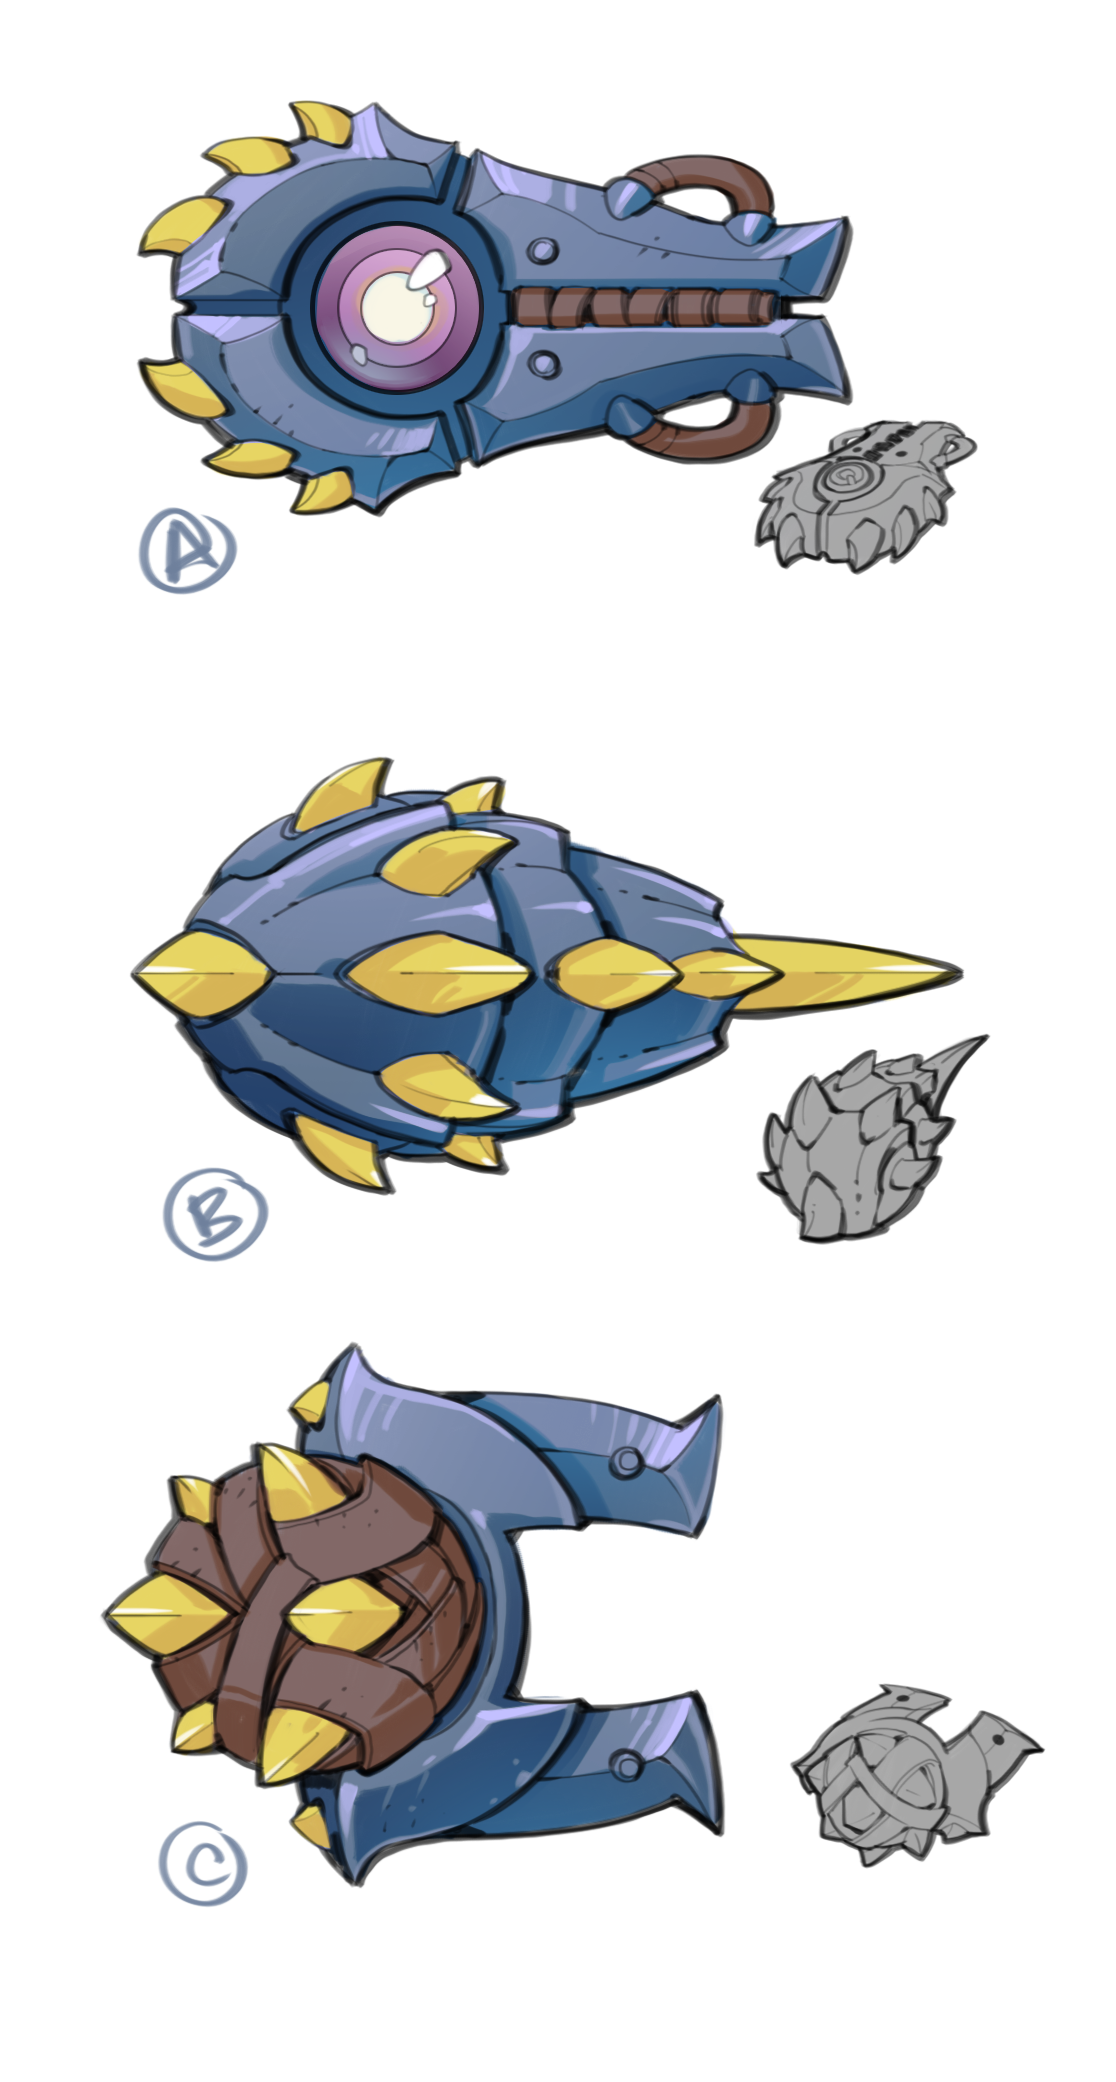
Gallery
Screencap via Nintendo Direct announcement.
Aether Strikers preview.
Aether Strikers Concept art[4]
Designs for the Drask Strikers.
Designs for the Embermane strikers.
Initial designs for the strikers.
Designs for the Skarn strikers.
Designs for the behemoth strikers.
Designs for the Quillshot strikers.
Refined concept design of the strikers.
Designs for the Nayzaga strikers.
Cover for the Aether Strikers


![Aether Strikers Concept art[4]](https://static.wikia.nocookie.net/dauntless_gamepedia_en/images/1/17/Aether_Strikers_Concept.jpg/revision/latest?cb=20190919175601)


References
| ||||||||||||||||||||